It is fairly common for laptops to have battery-related issues and if your laptop only turns on when you have it plugged in then you are probably very frustrated.
You can fix a laptop that only works when plugged in by disabling and re-enabling the ACPI-Compliant Control Method Battery and restoring the default power schemes in your power profiles within Windows 10. These methods should work for HP, Dell, Lenovo, Acer, and other laptops that won’t turn on unless plugged in.
Read to learn exactly how to perform these actions this step-by-step to get your laptop working with battery power fast!
How to fix a laptop that only works when plugged in
Unlike desktop PCs that must remained plugged in at all times in order to have power, laptops are able to run on both AC power (when plugged in) and battery power (when unplugged) so Windows has to juggle both of those power sources in real time as you use your laptop.
Unfortunately, it is fairly common for issues to arise with the Windows 10 power controllers which results in a laptop that only works when it is plugged into the AC power adapter and will shut off when the plug is removed.
To fix a laptop that won’t run or turn on without the AC power adapter, we need to reset the ACPI-Compliant Control Method Battery device inside Windows 10 that controls the battery and reset the power schemes for your power profiles.
By the way, if you would rather watch these solutions, check out the video version on my YouTube channel which I will embed below.
Otherwise, let’s take a look at each solution one-by-one!
Disabling and re-enabling the ACPI-Compliant Control Method Battery
Let’s check out how to do this step-by-step!
For this solution, we will hop over to the Device Manager within Windows 10 and look for the battery section. Open up the nested group and you should see this:
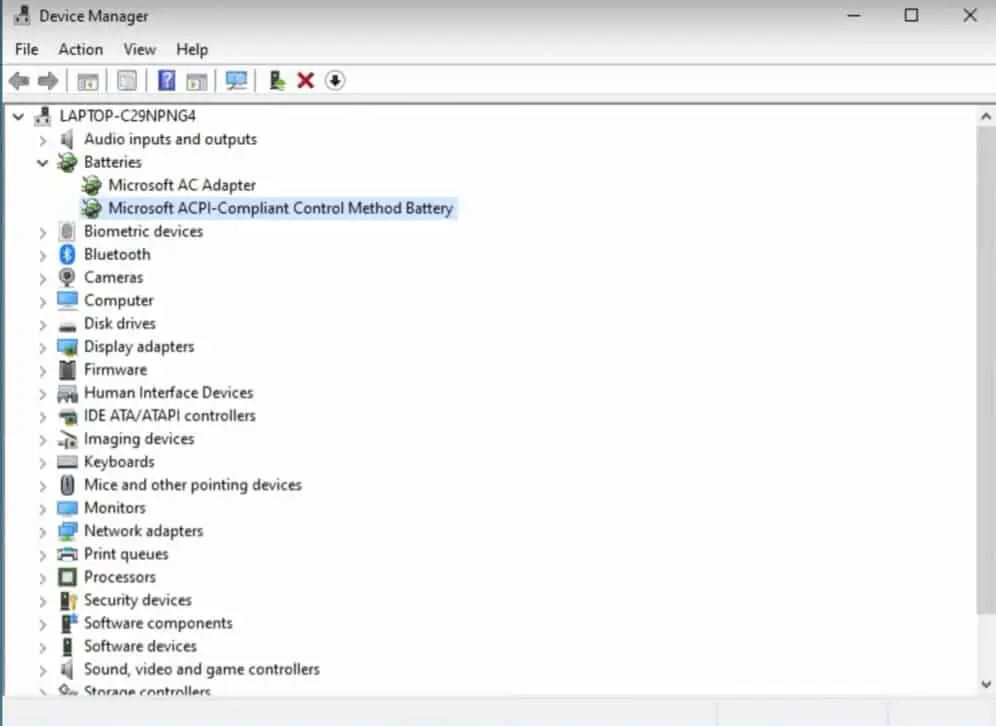
Next, you’ll right-click on the Microsoft ACPI-Compliant Control Method Battery item and then select ‘Disable device’
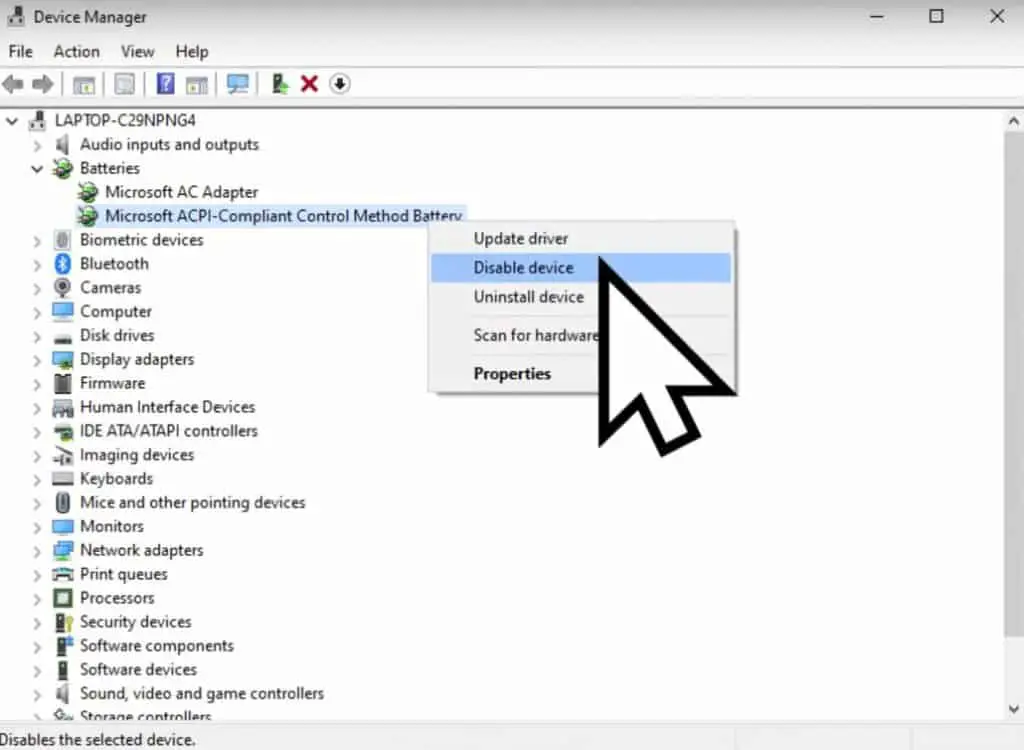
At this point, you’ll notice that your battery icon has disappeared from the bottom right corner of your taskbar. For all intents and purposes, your laptop is now running without a battery at all and is purely utilizing the AC adapter for power.
Right click on the Microsoft ACPI-Compliant Control Method Battery again and this time select ‘Enable Device’ to turn access to your battery back on.
You should now see the battery icon reappear on your taskbar and your laptop should be able to run on battery power without being plugged into the AC adapter.
If your laptop is still having issues, move on to the next solution.
Resetting the profile power schemes
All Windows 10 laptops will have a default power plan selected which determines the balance between performance and power-saving options within your system’s settings.
Power-saving profiles will maximize your battery life by lowering clock speeds, dimming your display, and putting your laptop to sleep automatically when not being used.
Maximum performance profiles, on the other hand, will keep clock speeds at stock, your display at full brightness, and generally not compromise on any performance-related settings.
Unfortunately, sometimes these power profile settings can cause issues with your laptop battery which causes it to only run when connected to the AC adapter and they should be reset back to the default, factory settings to help solve the problem.
Let’s walk through how to do that now!
First, open up the command prompt by searching for ‘command prompt’ in your Windows 10 search bar.
One open, you should see something like this:

From here, you will type “powercfg -restoredefaultschemes” without the quotation marks.
You won’t see anything obvious happen but if you typed it correctly then all of your power plan settings will have been reset back to default.
At this point, restart your computer and then check to see if your battery works by unplugging your laptop.
What if these two solutions don’t work?
If these solutions don’t work then it is possible that your laptop battery has become damaged or is no longer functioning properly.
Before you pay to have the problem fixed you should be sure that your laptop is completely up to date with the latest Windows 10, motherboard BIOS, chipset drivers, and other hardware drivers. Also, run the battery troubleshooter within windows by searching for ‘battery troubleshooter’ in the Windows 10 search bar.
You might also consider doing a fresh install of Windows 10 at this point.
At this point, you might want to call your laptop’s manufacturer or the place that you bought the laptop to see if they offer warranty support for this issue.
Hopefully this guide helped to fix your problem!


